
This book is available on Amazon. Get it at https://lnkd.in/gj4-aUt
Project Management is the one thing that will murder your business in your sleep, if you’re in a creative industry and you get it wrong.
This article is for those of you who are (a) creatives, (b) doing creative things for clients rather than yourself, (c) founder/CEOs, (d) in a micro business, or looking to move from freelance to structured.
And yeah, I know there are loads of articles online that give you hints and tips, tools, and tricks.
But you know what? I’ve been through what seems like all of them. None of them pulled all the threads together in a way that worked. Only experience did that!
Knowing it’s been a pain for me — and knowing for sure it is a pain for others (hi, all the beautiful people I coach and mentor!) — I’ve decided to pull this guide together.
You’ll find a PDF you can buy and refer to over and over again, at the end of this article. It’s not expensive, but I’ve put a dollar value on it because you will value it if you pay for it! And that means that you’ll be more likely to put it into action.
If you’re a reader/dreamer and not an action-taker, then don’t waste your time here. You’ll end up disappointed, and you’ll get more dopamine from a YouTube video.
Right. Ready?
Let’s dive in.
Step 1: Everything begins with lifestyle

You have probably seen internet Spinfluencers talking about the fact that you have to design your lifestyle first.
If you haven’t, here’s the thing: They began with the grand-daddy of motivational everythings, Jim Rohn. That was followed by Tony Robbins, who did an entire series on lifestyle design. And of course Tim Ferriss (what else was The 4-Hour Workweek but an entire book about designing your life?).
It’s also the one thing that everybody discounts.
I’m here to tell you that everything else starts with lifestyle design, because:
- Your lifestyle determines how many hours you have available for your business. Once you know this amount of time, you are better able to:
- Know your capacity for hands-on client work.
Let’s be honest: Lifestyle is the reason your business exists. If you have a business because you want a lifestyle, that tells me that you don’t have any experience running a business! Boy are you in for an unpleasant wake-up call.
Take it from someone who’s been around the block on this business thing a bunch of times: If you don’t design your lifestyle, someone else will. Taking control of your time is the smartest thing you can do.
How to design your lifestyle: A quick-and-dirty guide
This is the fastest way to do it. If you’ve got time (and desire), go and read the linked resources above; especially the one to Jim Rohn. Frankly, my little checklist will never replace that kind of awesome.
- Is it a deal-breaker for you to work weekends?
- Do you want to work weekends?
- Is it a deal-breaker for you to work evenings?
- Do you want to work evenings?
- What’s your ideal starting or working time?
- How many weeks of the year do you want for holidays? (Be realistic!)
- How much of your week do you want to give over to meetings, networking, catching up with people (knowing that people make both a business and a lifestyle: Remember friends?)
- What hobbies and other things do you do (exercise or training, learning or other things) that are not-negotiable? At this stage, the things that you love are not negotiable!
- What do you want to achieve in five years to which you could start building today, if you had the right lifestyle design?
Chances are good that you’ve got a full third (or more!) of your week already spoken for.
That’s a positive thing: Creativity demands space, even when you’re writing blogs about apparently boring things like concrete.
You also need to know that there is no right or wrong way to design your life. It’s YOUR life. Do with it whatever the fuck you want.
Step 2. Project Management starts, runs, and ends on capacity planning

The baby sister of project management, capacity planning, often gets missed in guides about project management. That’s often because your average project manager works in Corporate Fun Land, where someone else works out your hours.
Sunshine, this time it’s up to you.
- How much of your week do you want to spend handling the work, instead of actually doing it?
- How much of your week do you want to spend selling and marketing? Remember, all marketing takes time and effort!
- How much of your week do you want to spend on strategy, visioning, and thinking?
- How many hours can you work in a row without getting totally drained? If you don’t know, you might need to keep track of yourself for a week or a month to find out. But at least take a stab in the dark and work out your maximum from there: 3 hours, 4 hours, 5 hours, 6 hours, 7 hours, 8 hours, 8+.
- Is it important that you get a lunch break?
- What else you have in your life that you want time to do? Think about exercise, hobbies, reading, and hanging with family.
Ok, step back and look over what you’ve got. This is the shape of your life.
Now you know the rough shape of your life, it’s time to determine how many hours in your week you actually have available for client work.
Why is knowing your capacity important?
The most critical thing about knowing your capacity is that it allows you to safeguard your time. Being able to safeguard your time contributes to reduced stress, and that in turn allows you to do what you do best.
If you’re like many creatives (me included!), when you feel like you have all the time in the world, you’ll say yes to almost everything. And then you’ll face down the week in an utter, abject panic, find yourself working until 3 am every day, living on coffee, working every single day, never having holidays or breaks, and crying yourself to sleep every night.
Please don’t do that. The world needs you and your beautiful skills.
Leave the burnout to the startup bros.
You can track your capacity in many ways. Here’s an example (from my own life)
When I first started taking my time seriously, and my capacity seriously, I was simply using a Google Calendar. That was more than sufficient, for at least three years.
Except, I am the kinda gal who works best with a bird’s-eye view. That’s something I learned about myself along my project management journey, ironically: If I can’t see everything all at once, I panic and spend loads of time trying to get that vision back.
That’s how I lost love for a calendar.
Calendars are great for tracking tasks; they’re not so great for capacity-planning.
If you’re wondering what is the difference, it’s this:
- Calendars allow you to reserve time
- Capacity plans allow you to see how many hours you have remaining.
It’s a small, but critical difference.
For example, in my own world, a complex blog takes (on average) one to two hours to research, one to three hours to write (depending on the topic); 45 minutes to QA, run checks and write meta data; 5 to 10 minutes to deliver, depending on the required message to the client; and 5 to 10 minutes to close out. That’s a total time of between 4 and 5 hours.
If I have everything in a calendar with a view beyond my ideal working hours, I’ll simply be tempted to book in another job, rather than know that by adding another one, I’m going to be working overtime.
Calendars, my friend, are easy to ignore.
Enter the spreadsheet
Looking for something to replace a calendar, I chose a spreadsheet that gave me a year-at-a-glance. Each cell was marked with how many hours were available that day.
This way, I was able to book in work, or meetings, or whatever, and know exactly how many hours I had set aside that day. Then, as bookings came in, I could book them forwards as days filled up.
It was a pretty awesome thing to see loads of weeks marked BOOKED OUT, I can tell you!
But eventually that, too, wasn’t quite enough: I found that I still had to double-back to the calendar, so that meeting requests would auto-decline if the day was booked. With too many moving parts, something always got left out, and it took forever to do.
That’s how I came to be using Resource Guru, which I freaking love.
No, they didn’t pay me to say that.
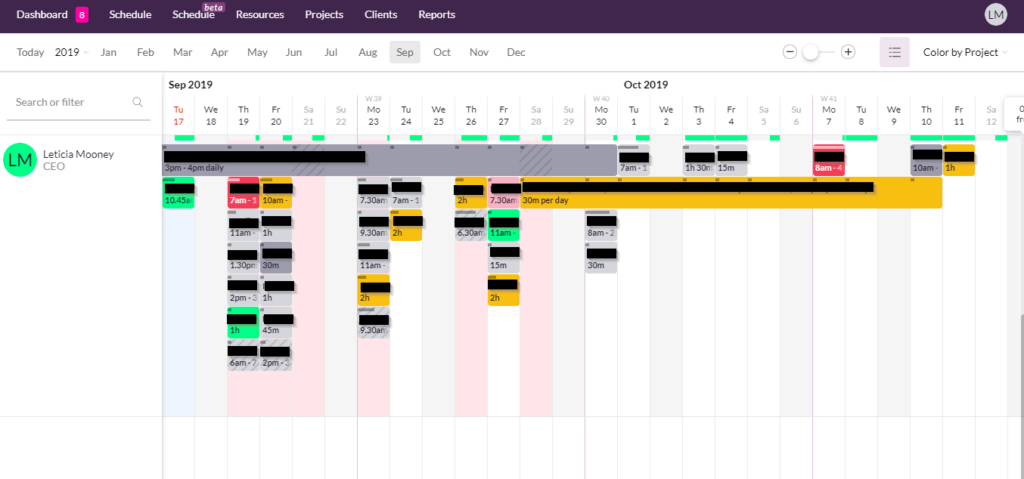
I’ve blacked out the names of things but at least you can see what Resource Guru looks like. The bright green lines just under the dates show you precisely how many hours are available in any given day.
Resource Guru allows you to establish as many resources (people, vehicles, rooms, tools, etc) as you wish, identify their availability, add types of leave, and book appointments and work into their schedules. And, best of all, it has a two-way sync with your calendar: If there’s not the time available, the time is not available.
It’s a godsend. With the sync, the price (it’s less than $5 a month), a daily schedule emailed to you, and a happy guru in the corner saying happy things when you log in, what’s not to like?
Capacity planning takeaways
It’s only critical that you track:
- How many hours you have available
- How many hours are eaten up when you book things in
- How many hours are left (from what was originally available)
Find yourself a method that you won’t get around and thereby sabotage yourself. Be honest about your self-sabotage, especially if you hate saying No to people. It might be important to you. It sure was to me.
Before you determine your capacity: Move to the Maker’s Schedule
If you haven’t seen the Maker’s Schedule, then boy are you in for a treat!
The Maker’s Schedule was documented by Paul Graham, co-founder of that amazing startup accelerator, Y Combinator.
When you look at your diary, schedule, or calendar, you will notice that it’s divided into half-hour or hour-long blocks of time. Great! Except, it’s totally shit for when you need to make things. It’s only useful when you need to manage things.
Graham’s explanation (a story that bears out in my own life) is that meetings can take up an entire day, even when they only go for an hour. How? Well, it takes time to get there, time to reorient, an hour in the meeting. By the time you’re even facing what you have to do next, three hours is gone.
In contrast, making things takes a minimum of three hours. It takes time to get into the zone, then once you’re in that zone, any distraction will destroy your day.
So, if you’re not already on the Maker’s Schedule, make the move TODAY.
You’ll be glad you did.
How to determine your capacity: A quick and dirty guide
Here’s the simplest and cleanest way to determine your capacity. It works for me, and has done so for a couple of years:
- Take the times you wrote out for handling work, marketing, selling, meeting people, and visioning, and add how much time you need for administration in a day (emails, invoices, reconciliations, tidying, etc).
- Taking your best work times, set them aside for focused client work, and take as much time as you want to. For me, that’s from 7 am until 1 pm at most (6 hours).
- Add time for breaks, lunch, walks, or other set up time.
- Stand back and survey your work.
Depending on how you prefer to work, you might find that you only have a maximum of 20 hours available in a week for actual client work.
If that’s the case, don’t freak out: Celebrate! Now you know how to maximise that time. If you charge by the hour, you also have an indication as to your maximum weekly income if you are living your absolute best life.
If you’re wondering, here’s how my ideal week is structured:
Monday, Tuesday, and Friday
- 7 am – 12 pm: Client Work
- 12 pm – 1 pm: Check messages, return emails, eat, walk, read, rest, etc
- 1 pm – 3 pm: Client Work OR Sales/marketing activity OR Client onboarding
- 3 pm – 4 pm: Shutdown ritual
Wednesday
No work! Wednesdays I dedicate to #LeticiaWrites. More info about that is here.
Thursday
Thursdays are meetings day. I set aside the entire day for meetings over coffee or lunch. Any work scheduled is not deep creative work, but the type of things that can be interrupted, like prospecting, research, work-related reading, visioning, thinking, or learning. And, no, “meetings” with friends don’t count. They happen after work or on weekends.
Step 3. Project Management Proper

From the outset, I want you to know that this setup looks like it isn’t an Agile type of project. And you’d be kind of right, though I’d argue that any of these steps — in a small or micro business — will be far more profitable to you than running agile. You can, however, use lean or agile tools and methods (from kanbans to standups) to track the actual work.
WARNING
This will feel like a waste of time.
I warn you about this because it’s true.
When I first started using this methodology, I had a running self-narrative that it was a waste of time. Why bother doing it, I told myself, when it’s mostly just me doing the work? Isn’t it just pointless administration?
The answer is: Well, it feels like that, but don’t be misled: It makes your entire life easier!
It feels like an hour and a half you might not get paid for. I get it.
Please ignore that little monkey brain of yours, because when you do it this way, your business will look much more professional.
Why does project management begin before the prospect is even a client?
Project Management in a creative industries business (that does work for other people) truly begins before you agree to quote on a project. It’s not something that happens afterwards.
The reason is because, unless you’ve done the steps to work out whether or not you can deliver it in the timeline you promise, you have no business promising anything.
You will no doubt have experienced clients who want everything yesterday.
And if you really wanted the cash, you’ll have said yes and then rued the fact that you agreed to do it. Right?
Pledge not to do that to yourself any more!
Factor another 1.5 hours into your qualifying or quoting sequence. When you do, and they say yes because your preparation is bedazzling, your only task is then to start when the Start Day arrives.
When that day happens a month or more after your proposal, and you jump into your project management docs to see everything done for you, it’s like being gifted a gigantic chocolate egg. It’s just magical.
3.1: Create a Project Identification Document
A Project Identification Document tells you:
- What the project is (title, category, client)
- What you’ve agreed to deliver
- What the key drivers for the project are (quality, spend, or time)
- Every single task required to get the job done, no matter how small, and how long you estimate they’ll take
For example, here’s one from our PIDs at Brutal Pixie:
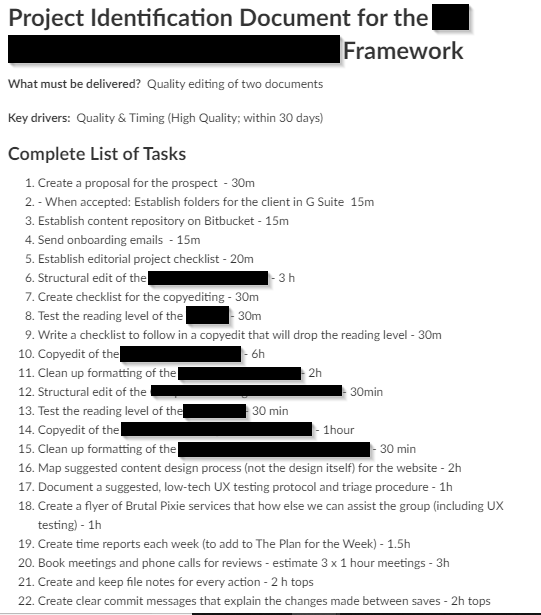
Key things to note
- The thing that you are to deliver should be an indication not just of the task, or the project, but what it is that they’ve come to you for. In the above case, it’s high quality editing.
- Every single task that you want to do in the job is included. You’ll see we have built an upsell into this service.
- Working out the really important things comes next.
What is the best way of estimating how long a task will take?
You’ve probably heard that old chestnut: “Add 10% to your estimate”.
Well, fuck that. Sometimes ten per cent is nowhere near enough time! You might not even know it until you get started. Instead, take a moment to stop and consider the average times of the very best and the very worst jobs you’ve ever done, and what that meant for each of their tasks.
Now, knowing this, draw a horizontal timeline:
- Write down the Absolute Best Case Scenario to one side
- Write down the Absolute Worst Case Scenario to the other side
- Mark the halfway point, and note the time at halfway
- Mark a point halfway between midway and the Absolute Worst Case Scenario.
That’s how you find the likely time that a task will take. May it never fail you.
3.2: Create a Network Map
A Network Map is a diagram of every task you have to do for the job. However, it’s special because it shows you what’s known as the critical path.
The critical path is what you are actually expected to deliver.
Project Management gurus advocate that you begin all Network Mapping on a whiteboard, using sticky notes. That way you can shuffle tasks around to your heart’s content. You can have a whole team involved and discussing it as/when you need to.
Once it’s finalised, you can capture it in a photo, or recreate it in a flowchart.
Here’s an example (below). It’s quite faint, but if you can zoom in, you’ll see that every task has the time noted next to it. The critical path is marked in red: That indicates the not-negotiable must-dos for the project delivery. Everything else slots in around it.

From here, you might feel that you don’t have the capacity or time to deliver the full extent in the time allocated. Thus begins the process known as “crashing”.
When you crash jobs into each other, pull others out, or otherwise modify the map to fit it into the time allocated, you might find that non-critical tasks become critical.
Why bother doing a Network Map when I already have tasks and times listed?
This is such an important question. And, as you’ve probably guessed by now, there’s a simple answer:
Network Maps allow you to work out what is essential.
It’s a peculiarity of humans that when we create a list of jobs, we tend to follow the list even if we ought to interrogate the list first. A Network Map gives you the space to ask: Is this actually critical? And it’s your time to play with, well, timing. It’s the only time you really have to play around with it and get the shape of the project to fit the timing you (and your client) requires.
3.3: Create a Gantt Chart
Now, I realise that in this day and age of kanbans, gantt charts are kind of Old White Man In Consulting. But I have to tell you: Nothing compares to them for giving you an overview of a project’s timing, how tasks relate to each other, and your capacity.
You don’t ever have to create a gantt chart by hand any more. My strongest recommendation is to use a project management software that includes it (I use Open Project), or get yourself some solid open source software like Gantt Project.
Here’s a bogus project I did up in Gantt Project to give you an idea about what they can look like:
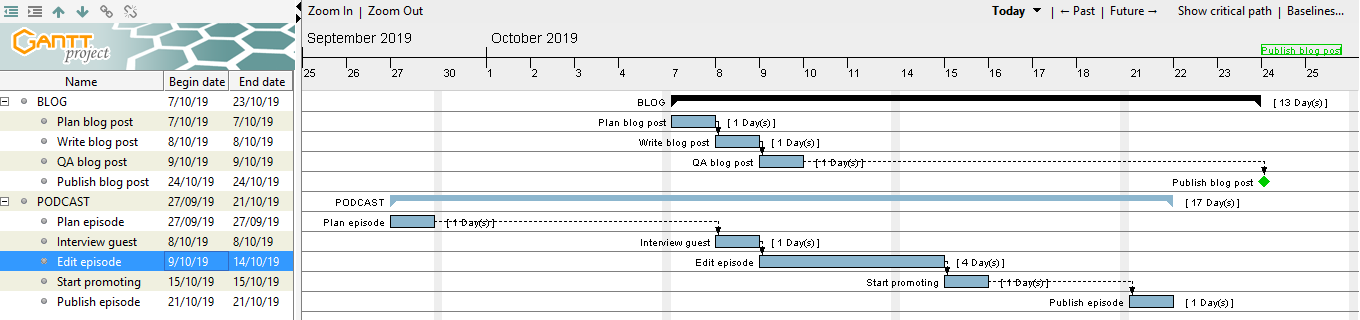
It’s worth taking the time to make your gantt charts effective for you. Adjust the colours, the labels, and how your projects relate to each other. Spend some time considering whether you want one gantt for each project, or a gigantic, collapsible gantt of all projects; or both!
Like with your capacity planning and lifestyle design, there are some rules that make them amazing, but ultimately it’s up to you.
How to ensure your gantt chart is effective
- Add your tasks, including:
- Who is accountable
- The duration of the task
- Any other notes
- Configure relationships between tasks: This is how you know which tasks are dependent on (or require completion of) others. This way you can predict blockages or delays, and work to prevent them
- Identify milestones
Pro tip: Gantt Charts are both effective AND impressive
When you present a prospect with a proposal complete with a gantt chart, you are saying two things:
- You completely understand the job
- You are a professional who understands his or her timing and capacity (and thus is more likely to do a good job).
These two things go a long way towards supporting a higher price point.
Clients of creative businesses often don’t fully understand the work involved. It doesn’t matter if you’re a programmer or an illustrator: Clients (often) have no idea about your world. Gantt charts give them meaningful insight, and – more importantly – show them why the project timing is the way it is.
Where should I manage the project once I have a gantt chart?
Technically, you can manage the entire project from your gantt chart.
How you track progress will be up to you. If you use software like Open Project, then gantts are built into every project you create.
But if you use a lightweight kanban tool like Trello, it would be sensible to create a card labelled Project Management. You can then attach or link all the other documents to that single card. While it might seem like double-handling on the tasks bit, the Project Management card then becomes your source of truth for the project, on that is accessible to everyone.
3.4: Create a budget & resource profile
Budgeting every single project is the one way you will understand whether or not the project is profitable.
You know, and I realise that it makes me sound like a moron, for years I never kept project budgets. The first time I took this seriously, I understood with absolute clarity why I felt like I had no money: The jobs were taking too long, and I was spending more than they were worth.
How to create a project budget
- Note down how much the client paid, and then subtract all taxes and all operational overheads excluding staff. The amount left is how much money you actually have to play with on this project.
- Add all team members and how much you expect to pay them
- Add all other costs
Then re-evaluate. This is a really good point at which to decide on your proposal options. If you only do X, Y and Z, then it’ll be this much; if you want me to do A, B and E as well, then it’ll be this much.
Your resource profile will show you who is involved and what they’ll be doing
If you use project management software that allows you to allocate people to the project, you don’t have to do this separately.
It is super handy to know exactly who is responsible and accountable for what, and why. If nothing else, it allows you keep the project moving along, and make sure that everybody involved knows what they are expected to do.
Having this clear at the outset prevents all kinds of nasty surprises.
Speaking of nasty surprises, this is where we dive into risk.
3.5: Conduct a Risk Assessment
And just when you thought we were nearly done, I’m asking you to complete a Risk Assessment. This doesn’t have to be complicated, and you don’t have to go to the details of likelihoods and occurrences. But you do have to think through all of the ways in which the project could go wrong.
In case you’re not sure why this is useful, I’ll explain.
Imagine you are an illustrator. Your client’s name is Wendy. You didn’t do a risk assessment and didn’t act to prevent consequences from risks as they arise.
But then, Wendy decided that she wanted three or four iterations of the illustration, because she couldn’t decide and wasn’t sure. You had had an inkling that Wendy was indecisive, but you didn’t really think anything of it. However, the impact is that the project dragged on and on forever, costing you time, and worry.
And then Wendy didn’t want to pay for those iterations anyway.
By the time you got to the end of the project, you hated her, you hated the job, you were out of pocket, and you’d had to crash your way through other jobs that you didn’t realise would run into each other.
Now, if you’d done a project risk assessment, and you answered the question, What risks do I face on this project? then you’d have likely added the client’s indecision.
Once you’ve done the risk assessment, you can go back to your tasks and timing, and adjust as needed.
How to run a project risk assessment: The quick and dirty version
I have a number of ways in which I run risk assessments, for different things, but the easiest of them all is a document with the following sections:
- What risks (real or potential) do I face on this project?
- What is the worst-case scenario?
- What would the social effects of this be?
- What would the financial impact of this be?
- How can I invest to reduce risks, or strengthen financial or social resilience?
Quite unusual questions, huh? They are all designed to get you to the heart of impact as fast, and as meaningfully, as possible.
What are financial and social risks?
Social risks are things like loss of relationship, loss of goodwill, potential for gossip, bad reputation, bad reviews.
Financial risks might include non-payment, opportunity costs of dealing with an over-extending project, compensation, refunds, and even potential or future losses as a result of social risks!
Thinking through how you can invest will surface new ideas
This is where innovation truly starts. By thinking about how you can invest to reduce risks, or strengthen resilience, you are really looking at ways to plug gaps and prevent negative situations from occurring.
Downstream of this, you might:
- add time to tasks
- make consultation or meetings critical path
- design new contracts
- decide to up your communication
- … and many other things
3.6: Decide whether to take on the project
If you’ve done this the way I advocate, you will have gotten to Step 6 having done all the above work for a prospect.
Now is the time to decide: Can you (or will you) commit?
If you choose to commit, now is the time to send a proposal.
If the prospect thinks you’re as awesome as I do, they’ll say yes. Wow, now 100% of the project time is on the project itself. No more factoring in set-up time and project management! Woohoo! All you have to do is schedule it.
Should you do all of this work, but it becomes obvious that you can’t do it, can’t do it in the time they want it done, or don’t want to (for example, you’ve decided that it’s too risky for whatever reason), know that your decision was made for good reason. If you hadn’t done the work up-front, you may have made an arbitrary decision and regretted it, or felt guilty after saying no.
Welcome to being an Empowered Creative Business. Feels good, doesn’t it?
More importantly, the system of project management I’ve outlined for you is robust. As your business grows, you’ll find that doing this stuff well is what will stand you in good stead.
3.7: Proactively manage the project
For the duration of the project, make sure that you check in on progress at least once a week. Keep all records (including time spent records!) up to date, and know exactly where you are.
Now that you have everything established, it is a minor issue to keep everything up to date.
Importantly, you’re in a better position from which to spot additional risks or red flags. As you get better at this work, you’ll be able to identify leading indicators which are project measurements that tell you to take action. Things like, clients not responding to calls or emails; delays on every single deliverable; or even overblown costs. When you have leading metrics, you can add in measurement points to your weekly review.
When your project is complete, take the time to ask:
- What went well
- What went poorly
- What was a challenge
- What can we do better next time
- What should we repeat
And then adjust your process to make the next one even better.
As creatives, we truly are in the business of manufacturing, and it’s important to take continuous improvement seriously. Even in such “boring” amazing things as project management.
In Summary
The flow of project management in a creative business starts from your own lifestyle. Know how you want to live, because it will determine your capacity. Once you know your capacity, you can allocate tasks and hours to a job.
By running project management processes before a prospect is a client, your project handling will improve, your time to delivery will improve, and you will be a lot less stressed as a result.
That’s what I call win, win, win.