
People think scones are hard to make well. They’re not, and here’s proof.
The only recipe I have ever used – best in the country I’d argue! – is the one in the PMWU Cookbook. Back home, which is Western Victoria – this town to be exact – the farmers’ wives used to say that you should be able to see a visitor come through the bottom gate, bash together a batch of good scones, and have them on the table with jam and cream by the time your visitors are knocking on your front door.
Driveways over that way are pretty long; like, a coupla kilometres long. And rutted, so it takes longer to drive on. But you get my point.
Unfortunately, my ex has the PMWU Cookbook my mother gave me when I left home at age 18 (sad face). And it is currently out of print(!) so I can’t get a copy. But this recipe is based on that old gem, and it’s almost as good.
The secret to good scones is very basic. Every old woman will tell you it’s the real buttermilk in the recipe, which is no doubt true. I’ve never used buttermilk in them my whole life and I still get fabulous scones that stand three or four inches tall. What’s the secret?
Sifting.
Pay attention to your flour and you shall be rewarded. You can do this even if you don’t have a sieve… but more of this in the recipe.
Enjoy!

Basic Scones
Ingredients
- 2 cups of self-raising flour
- salt
- 1 Tbsp caster sugar
- 60g (approx 3 Tbs) of butter, chunked up into small chunks
- 3/4 cup of milk (buttermilk if you want, full fat milk is just as good)
Method
- IF YOU HAVE A SIEVE, lay out three sheets of newspaper, one on top of the other, at slightly different angles. Sift your dry ingredients onto the top. Lift it at the corners, put your sieve on the next layer and sift the dry ingredients onto that one. Repeat onto the third layer. Do this all again from the beginning. Your dry ingredients ought to be super light, super fluffy, and almost full of static.
- IF YOU DO NOT HAVE A SIEVE, put your dry ingredients into a large bowl. Grab a large steel tablespoon with sharp-ish edges. Using one hand, turn the bowl while you flick-mix the dry ingredients together. It’s hard to explain, but it’s pretty much scoop, lift, flick – turn. Imagine this really quickly and you have yourself flicking the ingredients together. Do it for a couple of minutes and you’ll have equally light and fluffy dry ingredients.
- Throw in your butter and rub it into the flour until the flour is tinted yellow, and has the consistency of extremely light and fluffy tiny crumbs. I’m talking really tiny. Granular. If you don’t know how to do this, use your fingertips only. If the palm of your hand has flour on it, you are doing it wrongly. If you’re not sure whether you’ve rubbed in all the butter, shake your bowl back-and-forth really quickly; the lumps will come to the top. Do it until it’s all done. Skimp on this and your scones will suck more than they should.
- Make a well, and using a flat-bladed knife (a butter-knife is perfect), gradually mix in your milk (or buttermilk). You shouldn’t need any more milk than this to bring the dough together.
- Turn it out, knead it very briefly. For the love of the Dark Lord don’t squish the air out of your dough!!! Big fail if you do.
- Flatten out your dough until it’s even, and about 2-3 cm thick.
- Sharply cut out your scones. If you don’t have a scone-cutter (I don’t), you can use a wine-glass, but you’ll get fewer scones. Just cut the damn things into squares. It’s not traditional but who cares if they’re awesome. Right?
- Plonk them, spaced out enough to let them rise, on a greased or lined baking tray, brush with milk, and bake for 12-15 minutes.
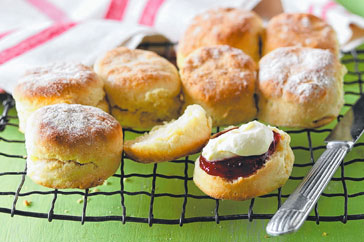
- Eat hot with jam and cream. Nommmmm..